The advent of several “point and click” or “drag and drop” tools have eased data manipulation for analysts. Data retrieval, wrangling and cleansing is becoming a task which anyone can perform. However in some scenarios such tools fail to manipulate advanced or complex analysis without the inclusion of typing in programming lines into custom transfiguration. Tools like R and Python are still the most preferred tools due to their advanced nature of handling statistical analysis and machine learning complexity.
Every Data Scientist or Analyst spends about 80% of his/her time in data wrangling and only about 20% of the time in the actual analysis. Many packages in R programming language are quite extensively used for complex data retrievals. The dplyr package is pretty neat in performing several data munging tasks. In this blog I am aiming to cover the various functions and capabilities of the dplyr and the tidyr packages.
With the recent Star Wars movie released, I want to use the starwars tibble for some analysis here!
Calling all libraries and datasets:
> library(dplyr)
> library(tidyr)
> data(starwars)
A tibble is quite different to a data frame in terms of printing or subsetting and it is simply a nicer way to create a data frame. It never adjusts the names of the variables of changes the input type. Check this article for more details.
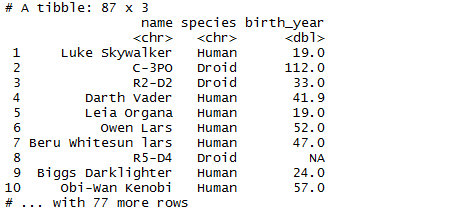
Now let’s view the dataset:
> starwars

A tibble also displays just the top 10 rows and displays it on my Rstudio console. A dplyr equivalent for a data frame is the following command which also makes it easier to display the data
> dplyr::tbl_df(starwars)
If we want to just glimpse the data we can use the following as well
> dplyr::glimpse(starwars)

Now one particular format that is commonly seen in dplyr code is the piping symbol which is %>%. It passes the object on the left hand side to the function on the right and makes the code more readable. We will see more of this later.
Now let’s look at the different row-wise filtering options.
> dplyr::filter(starwars,mass<=20)

And I get what I wanted to see! Yoda’s mass is 17, so the data is included in the results.
If you just want to view a set of rows say from 14 to 15, then we do the following:
> dplyr::slice(starwars, 13:14)
And look who we have here! Han Solo and Chewbacca.

Here is a column-wise manipulation:
> dplyr::select(starwars, name, species, birth_year)
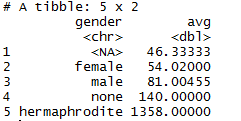
We can also do summary and grouping operations. For example if we want to see the average mass by gender, then:
> starwars %>%
 group_by(gender) %>%
 summarise(avg = mean(mass, na.rm=TRUE)) %>%
 arrange(avg)
We can also create new variables. Say I want to create a BMI value. For the sake of simplicity let’s ignore gender and set the formula to be weight / height(squared).
> starwars %>%
mutate(bmi = mass/(height^2)) %>%
arrange(desc(bmi)) %>%
select(name, species, height, mass, bmi)
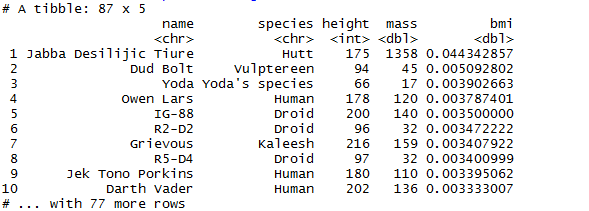
I am not going to talk about the above results!
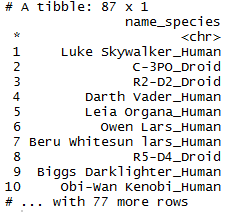
We can also reshape some results using tidyr. Here is an example to append species and name.
> starwars %>%
unite(name_species, name, species) %>%
select(name_species)
References: This amazing cheat sheet.
